Thursday, August 4, 2016

Lemon Risotto (How to prepare in advance)

Creamy, delicious, comfort food!

Risotto is the perfect side when you are craving something tasty AND want to impress! Plus it's not as difficult to prepare as some believe.


We served this lemony risotto with blackened grouper and roasted asparagus...it was outstanding! Impressed our guests, that's for sure. Special thank you to Mariah for providing and preparing the amazing "FRESH" grouper!


I prepared (aka par-cooked) the risotto about 2 hours before dinner was served...this saved me SO MUCH time and work...I didn't have to stand over the pot stirring for 20 minutes while my guests were here. Once we were ready to eat - I finished cooking the risotto and the end result was perfection! *This is what restaurants do!


Lemon Risotto Recipe 

(when you want to make it in advance- up to two hours before serving)

Ingredients:

  • 1 quart chicken stock
  • 1 cup water
  • 1.5 cups Arborio rice
  • 2 tbsp butter
  • 1/4 cup pre-grated parmesan cheese OR 1 cup of fresh grated parmesan or pecorino (the latter is preferred)
  • Zest of 1 lemon
  • Juice of 1 lemon
  • Salt & pepper
  • EVOO
  • 1 medium onion (white or sweet)
  • 2 cloves of garlic
  • 1/2 cup of white wine (cooking)
  • Casserole dish for cooling the par-cooked risotto 
Steps:
  1. Heat a splash of EVOO over medium-high heat in a round pot.
  2. In a separate sauce pan, heat and simmer the stock + water...keep hot/warm. 
  3. Saute the diced onion in the olive oil for 3 minutes then add the crushed garlic the last 30 seconds.
  4. Add the rice and lemon zest to the onion/garlic, stirring constantly, and cook for 1 minute. 
  5. Pour in the white wine and cook until absorbed. 
  6. For the next 16 minutes, ladle in the hot chicken stock, one cup at a time, waiting for it to absorb, before adding more (STIRRING CONSTANTLY). Do this with about 3.5 cups of the stock. You will need to reserve around 1-1.5 cups when you finish cooking. 
  7. After the 16 minutes, when your 3.5 cups of stock have been absorbed by the rice, immediately remove the pan from the heat and pour the rice into a casserole dish - spreading the risotto out evenly to help it cool down and stop cooking. The rice should be undercooked. Once cooled off a bit - cover with plastic wrap and keep on the counter until you're almost ready to plate your dinner.
****When you're ready to finish cooking the risotto**** (right before plating your meal)
  1. Heat the reserved stock/water over medium-high heat in the larger pot that the risotto was originally in.
  2. Add the risotto back into the large pot with the stock.
  3. Stir quickly and constantly until the stock has been absorbed.
  4. Add butter, parmesan cheese, lemon juice, and stir to combine. 
  5. Add salt/pepper to taste.
  6. Continue stirring until the rice has fully cooked and is al dente. 
I can't wait to try more risotto recipes!

Bon apetit!

Tuesday, March 22, 2016

Korean Beef Tacos (Garbo's Grill Copy Cat Recipe)


Have you ever tried the Korean Beef Taco's at Garbo's Grill in Key West, FL? If not, you're missing out. If you can't make it to Key West, I strongly urge you to make these! They were so delicious, Trey and I made them twice in one week. I even purchased an extra large electric skillet for this recipe! The best part is how simple they are. Ridiculously simple. (Don't be fooled, the prep, specifically prepping the meat, can be tedious).

I followed the recipe posted on foodnetwork.com exactly the first time we made these. The second and third time, I tweaked a few things!

Here is the link to the recipe: http://www.foodnetwork.com/recipes/korean-bulgogi-taco-recipe.html

Tips: 
  • Double the marinade; use the extra marinade for the reduction/sauce. Reduce for around an hour on medium/low; this will be used as a sauce to toss the cooked meat in before serving. Save the leftovers (will stay good in the fridge for up to 2 weeks).  
  • Use matchstick carrots in the slaw; gives it more color. I skipped the cilantro and just used that as a garnish. 
  • Use flour tortillas; grill them before building the tacos. 
  • Don't toss the slaw in the citrus soy vinaigrette; spoon over slaw when building the taco. 
  • Purchase boneless beef short ribs (if you cannot find boneless, ask the butcher at your local grocery store, they should be able to remove the bone for you - they will re-label the now boneless short ribs, and you'll save some work and a couple of bucks!). When you are slicing the beef, make sure to take your time removing large pieces of fat. Make sure your slices are THIN, almost paper thin!
  • Make a "Lime Crema" to drizzle along side the sriracha on top of each taco! YUM!
Lime Crema: 
1 cup sour cream
Juice of 1 lime
Zest of 1 lime
Salt - to taste


Monday, February 1, 2016

Easy Chili Recipe!

Traditional Chili
Serves: A lot! 

What you need: 
Crock pot
1 lb of ground beef (or turkey)
1 large onion
2-3 multi colored bell peppers
2 cans of spicy chili beans
1 can of dark red kidney beans (rinsed)
1 can of light red kidney beans (rinsed)
1 large can of diced tomatoes
1 large can of tomato sauce (use enough to reach your desired consistency)
1-2 tbsp of diced pickled jalapeños
Spices: salt, pepper, cumin, chipotle chili pepper
*Don't forget the sour cream and sharp cheddar as a garnish!

Steps: 
1. Brown the meat in a pan, drain, and add the meat to the crockpot. 
2. Saute the chopped veggies in the same pan, then add to the crockpot. 
3. Add all of the beans, diced tomatoes, and jalapeño to the crockpot. 
4. Add tomato sauce to the crockpot until you have your desired consistency. 
5. Season the chili with salt and pepper to taste. add 1 tsp of cumin and 1 tsp of chipotle, mix and taste. Add more to your liking! ( I didn't measure the spices last time I made this chili). 
6. Cook on low for 3-4 hours. 

Enjoy! 

Creamy Penne Chicken Marsala

Creamy Penne Chicken Marsala
About 6 servings

Ingredients:

2 plump chicken breasts
Flour (for dredging the chicken)
1 stick of unsalted butter
1 lb of sliced mushrooms
1 onion (sliced or diced)
5 cloves of garlic (diced)
2.5 cups of marsala wine
1 cup of beef broth (or chicken broth)
1 cup of heavy whipping cream
1 packet of mushroom gravy/sauce
1 lb of penne pasta
6 oz container of freshly shaved parmesan cheese
1/2 tbsp of cornstarch

Steps: 

1. Cut each (2) chicken breast in half, pound out thin, and season with salt and pepper, then dredge in flour. 

2. Melt 2 tbsp of butter (medium low) in a pan and brown the chicken on each side (until cooked thru). Remove the chicken from the pan, dice, and set aside. 

3. Add 1 tbsp of butter into the same pan and saute the onion until cooked/softened. 

4. Add another tbsp of butter and mushrooms (1lb) - cook together with onion until the onion is caramelized and mushrooms are cooked. Add diced garlic the last 2 minutes. Do not overcook the garlic. 

5. Remove onion/garlic/mushroom mixture from the pan and set aside. 

6. Add the marsala (1.5 cups) to the same pan, bring to a boil and scrape the browned bits from the bottom of the pan. After a few minutes add the beef broth (1 cup) and heavy cream (1 cup) and bring back to a boil, then reduce to a simmer and let it reduce for about 20 minutes. Add 1/2 tbsp of cornstarch (dissolved in cold water) and bring the mixture back to a boil once more (for a minute) and return back down to simmer - helps thicken the sauce.

7. Cook pasta according to package and drain. 

8. In a separate sauce pan, make your mushroom gravy (packet), but instead of water, use marsala (1 cup). Once the gravy is beginning to thicken - add to the marsala sauce. 

9. Add the chicken and onion/mush mixture into the marsala sauce. Add 6 oz. of shaved parmesan cheese and stir. 

***Don't forget to taste the marsala sauce at this point and season with salt and pepper to taste!

10. Add the drained pasta back into the pot (over LOW heat) with 3 tbsp of butter....then add the marsala mixture to the pasta, stir and cook for a minute until the pasta absorbs some of the sauce. 

Enjoy!


Tuesday, October 6, 2015

Bacon Wrapped Stuffed Dates

Oh my...ladies and gentlemen, I think I'm back (in the kitchen)....(for now...)

These little guys were awesome!

Center Cut Bacon Wrapped Stuffed with Gorgonzola and Honey Goat Cheese Dates!


Ingredients: -Bacon (avoid thick cut, I used center cut and it was perfect!), cut in half (or thirds if you have long pieces of bacon)
-Pitted/Dried dates (near the raisins)
-Gorgonzola cheese
-Goat cheese (I used honey flavored, it was really good, but might use plain next time - it was pretty sweet!)
-Seasoning mixture: 1/2 teaspoon Kosher salt, 1/2 teaspoon cayenne pepper,1/3 teaspoon garlic powder (you can eyeball this, and play around with it! You might need to make more depending on how many dates you make.)

Steps:
Preheat oven to 385 degrees F 
1. Mix 1 part Gorgonzola with 1 part goat cheese and set aside.
2. Slit open the dates (make sure not to cut them completely in half) and stuff them with the cheese mixture; press them closed (like a stuffed taco). 
3. Wrap the bacon around each stuffed date and secure with a tooth pick. 
4. Mix the dry seasonings and sprinkle all over each bacon wrapped date. 
5. Place the dates on a rack/cookie sheet and bake for 15 minutes on one side (rotate pan once) and then 15 minutes on the other side. Depending on how crispy you like your bacon, you may want to continuously check on the dates, and extend the times as necessary. The good news is that the seasoning helps the bacon crisp up!!)

Enjoy!

Stuffed and wrapped: 

Prepped with seasoning:


All done, crispy and tasty!

Thursday, October 23, 2014

Butternut Squash Chipotle Chili (Vegetarian)

This is another recipe from the healthy eating/working out "Challenge" Kerri and I are doing...and wow! It was a huge hit. Thank you Kerri for sharing, I will be making this again, and again, and again...

The sweet, spicy, cinnamon-y kick is so unique. The two people I was able to share this meal with absolutely loved it and went back for second helpings! And if you've never cooked with butternut squash, do not worry, neither have I! Just be prepared to work hard *that is one tough fruit!

Recipe adapted from: CLICK HERE
Warning: This is very spicy!

Butternut Squash Chipotle Chili (SPICY!)
Prep time: 30 minutes
Cook time: 1 hour
Servings: 6-ish

Ingredients:
3 tablespoons of olive oil
1 medium/large butternut squash, peeled and cubed
2 bell peppers (I used orange), chopped
2 onions, chopped
2 chipotle peppers in adobo sauce, diced *please use 1 for a milder version, or none if you don't like heat. If you don't want the heat just use the adobo sauce for the smoky taste
2 cans of black beans, rinsed
1 can of corn, drained
1 can of rotel (I used hot) or diced tomatoes
2-4 cups of vegetable stock (optional: chicken stock)
Salt to taste
1 tbsp of chili powder
1.5 tsp of cumin
1/2 tps of ground cinnamon
2 bay leaves
Avocado for garnish
Optional: Grilled/shredded chicken if you need some "meat"

Steps:
1. Over medium heat, saute (with olive oil) butternut squash, onion and bell peppers until the onion is translucent. 
2. Add beans, corn, tomatoes, chipotle pepper, vegetable stock (more or less, depending on the consistency you prefer) and all of the spices. Mix well and cover.
3. Cook on medium low heat for one hour, stirring occasionally.
4. After an hour, try it and make sure the butternut squash is cooked through; garnish with avocado and serve. 

 Step 1 (pictured below):

Steps 2 and 3 (pictured below):


The final product, just add avocado and you'll be in heaven!

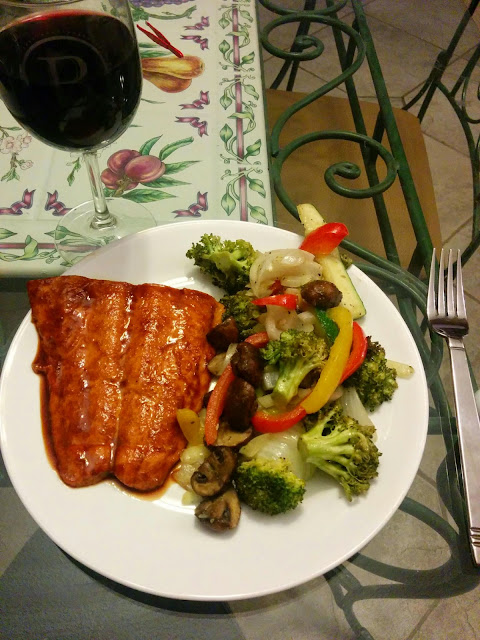
Spicy Sriracha Salmon Glaze


Spicy Sriracha Salmon Glaze
Adapted from: RECIPE

Ingredients:
2 large or 3 regular salmon filets (skinless)
3 tbsp honey
3 tbsp sriracha
3 tbsp soy sauce or Dale's seasoning
Optional: splash of Worcestershire, garlic powder, chili powder


Steps: (preheat oven to 350 f)
1. Prepare salmon by rinsing and patting dry. Sprinkle w/ desired seasonings (garlic/chili powder) on each filet and place in greased baking dish. 
2. Mix honey, soy/dales, sriracha (and Worcestershire, optional) and brush on each side of the salmon, generously. 
3. Bake uncovered for about 20-25 minutes total. *Baste the remaining glaze on the salmon every 7-10 minutes until cooked through.

*For a serious flavor bomb, marinate the salmon in the soy/Dale's and sriracha for about 20-30 minutes before baking

As you can see I served this with a baked veggie medley: toss veggies lightly in olive oil and season to your liking, bake, uncovered next to the salmon. 

Enjoy!

Wednesday, October 8, 2014

White Bean "Alfredo" over Zucchini Noodles w/Mussels


Week two of our challenge, and Kerri shocks me with this awesome recipe: 


I decided to keep it healthy and served the "Alfredo" over zucchini noodles with sauteed mushrooms and mussels (in a red sauce). Let me start off by saying this vegan "Alfredo" was SO much better than I was imagining it was going to be. The meal took no longer than 20/30 minutes to prep and cook. Loved it! 


Servings: 2
Time: 20-30 minutes

Ingredients:
1 can of garbanzo beans
1 cup of almond milk (or soy)
2-3 cloves of garlic
margarine/butter/vegan margarine
salt/white pepper/crushed red pepper flakes
2 large zucchinis
1 container of sliced mushrooms
Coconut oil
Optional: Seafood (mussels, scallops, shrimp) or blackened chicken

Steps: 
1. Prep the zucchini by rinsing, trimming the edges off, and using a spiralizer to create noodles. 

2. Make the sauce: Saute diced garlic with margarine for 2 minutes (until golden and fragrant). In a Magic Bullet or food processor add garlic mixture, 1 can of rinsed/drained beans, and 1/2 cup of milk. Blend. Add more milk, one splash at a time, until you reach your desired consistency. Transfer sauce into a small sauce pan, season with salt, white pepper, and crushed red pepper (to your liking) and heat over low/medium-low. 

3. In a large pan, heat coconut oil and saute mushrooms for about 4 minutes, until semi-soft. Add the zucchini noodles and toss well to coat them with the coconut oil (I salted the noodles at this point). Cook for an additional 4-5 minutes. Drain and plate immediately. 

Optional: prepare your seafood of choice (or chicken) separately. 

4. Once the noodles are plated, top with the warm "Alfredo", and enjoy! 

Tuesday, September 30, 2014

Vegetarian Enchiladas (with #sweetpotato)!

Black Bean, Corn, Green Onion and Sweet Potato Enchiladas

So, my friend Kerri (A.K.A. Valt) and I started this long distance, diet/exercise challenge on Monday. The gist of this "Challenge", as we call it, is to take turns (weekly) and provide each other with at least 3 recipes and 3 workouts, that are to be completed by the end of the week. Well, we're only on Tuesday, and Kerri couldn't have said it better: "I feel like I'm eating like a king!". 

I provided a total a 6 recipes and we both cooked our second recipe of the week, today. She made a delicious red curry with shrimp over Thai noodles (YUM, can't wait to try that one!) and I made these delicious veggie enchiladas! 

The recipe is a combination of these two I found for the "Challenge":


Prep time: 1 hour (includes cooking sweet potato)
Cook time: 30 minutes

Ingredients:
1 large can of enchilada sauce (or make your own)
OPTIONAL: 2-3 cups of cheese (I combined Mexican blend and mozzarella)
1 small can of green chilies (diced)
6-9 green onions (scallions)
1 can of corn
1 can of black beans (rinsed and drained)
3-4 sweet potatoes
6-8 large flour tortillas
1/2 jar of your favorite salsa
1 tablespoon of cumin
1/4 teaspoon Himalayan pink salt

Steps:
1. Cook the sweet potato in the oven at 375 for an hour, or until you can easily puncture the potato with a fork. 
2. Peel the skin off of the potato and dice into 1/2 inch cubes.
3. Mix the potato, corn, black beans, green onion, green chilis, cumin, salt, 1-2 cups of cheese (after making these a few times, I've decided to OMIT the cheese in the filling), and salsa. Mix well


4. Coat the bottom of a greased pan with a little bit of the enchilada sauce.
5. Stuff the tortillas with the mixture, roll, and place (seam down) into the pan. 


6. Cover the enchiladas with the remaining enchilada sauce and sprinkle with cheese. 
7. Cover with foil and bake at 350 degrees for about 30 minutes. Remove the foil and bake an additional 30 minutes or until the cheese/sauce is slightly bubbling and the edges are browned.


Optional: Garnish with diced tomatoes, fresh jalapeños, scallions. Serve with sour cream or guacamole. Don't forget the hot sauce!

Enjoy!


Tuesday, September 16, 2014

Tomato Slices topped with Avo-Tuna


Healthy and easy lunch option!

Serving: 1
Time: 5 minutes

Ingredients:
1 can of tuna
1 avocado
2 stalks of celery (diced)
4 tomato slices (1/2 inch)
Juice of 1/2 lime
Salt/Pepper
Optional: Greek yogurt

Directions:
Mix together the first three ingredients (adding one teaspoon/tablespoon of greek yogurt is optional; this will make the tuna fluffier). Add in celery, salt/pepper and lime juice (taste and season to your liking). 

Top the tomato slices with the tuna and serve with carrot sticks.

Enjoy!